This document is a primer towards creating an environment in which you can create and deploy your Data Science projects.
Setup Docker
If you have no AWS account go to the AWS website and follow the instructions. You will need a valid credit card to finish the process but rest assured, following this instruction you will remain in the free tier.
Create EC2 instance
If you have no AWS account go to the AWS website and follow the instructions. You will need a valid credit card to finish the process but rest assured, following this instruction you will remain in the free tier.
Once you’re finished head to the EC2 page (Services -> EC2) and hit Launch Instance.
- Press Select for a Ubuntu 16.04 64-bit image (ami-de8fb135).
- Pick the
t2.microinstance type. It’ll be enough for now, you can increase resources later if required. Hit the Review and Launch button. No further configuration is required right now. - Review and hit Launch. You will have to select or create a key pair. Give it a proper name (i.e.
docker) and download the private key file to a secure location. Don’t lose it, you need it to create a connection to your VM later. Hit Launch Instances and wait for a short moment while the instance is prepared.
Connect to EC2 instance
In the meantime you can already navigate to the directory where you stored your key file. It has a .pem extension but is not yet fully prepared to be used. Open a terminal window (or any other command line interface (CLI) with ssh support available to you) and go to the directory. Type chmod 400 docker.pem, replacing the name of your key file, into the console. Afterwards lets connect to our factory new VM. You can find the IP address by looking at the EC2 dashboard and while the instance is selected hitting Connect and copying the command or look at the instance description for the IPv4 Public IP (i.e. 18.185.136.0). Type ssh -i "docker.pem" ubuntu@18.185.136.0 replacing your EC2 IP and key file. Your terminal should look similar to this:
phndrff:tmp phndrff$ chmod 400 docker.pem
phndrff:tmp phndrff$ ssh -i "docker.pem" ubuntu@18.185.136.0
Welcome to Ubuntu 16.04.4 LTS (GNU/Linux 4.4.0-1061-aws x86_64)

 * Documentation:  https://help.ubuntu.com
 * Management:     https://landscape.canonical.com
 * Support:        https://ubuntu.com/advantage

  Get cloud support with Ubuntu Advantage Cloud Guest:
    http://www.ubuntu.com/business/services/cloud

0 packages can be updated.
0 updates are security updates.


Last login: Sun Jul 15 13:44:37 2018 from 88.152.11.206
To run a command as administrator (user "root"), use "sudo <command>".
See "man sudo_root" for details.

ubuntu@ip-172-31-22-237:~$
Now that we are in, let’s do some final preparations:
- Update and upgrade your libraries with
sudo apt-get updatefollowing up withsudo apt-get upgrade -y. - Install LinuxBrew with
sudo apt install linuxbrew-wrapper. Test the installation by checkingwhich brewandbrew install hello.
Now we have a great package manager for our instance that is accessed by using brew. If you like the classic route, that’s fine with me. Many years working with UNIX on a Mac Book made me really appreciate brew for managing packages and other software products from multiple sources.
Install Docker
Let us continue with another great tool for a Data Scientist and their team. Docker is a container platform with a shared operating system where we will be able to deploy our data products. For now just imagine Docker as some kind of very smart virtual machine without its own operating system called containers.
We will install Docker via curl -sSL https://get.docker.com/ | sh and make our workflow easier by adding us to the docker administrators sudo usermod -aG docker ubuntu. To take the change into effect, quickly restart our session by typing exit into our terminal and reconnect with the ssh connection.
After we reconnected to our instance, we need to start the Docker service by sudo service docker start. If everything goes well, we can check the status by typing sudo service docker status. The result should look like this:
● docker.service - Docker Application Container Engine
   Loaded: loaded (/lib/systemd/system/docker.service; enabled; vendor preset: enabl
   Active: active (running) since Sun 2018-07-15 16:25:16 UTC; 14min ago
     Docs: https://docs.docker.com
 Main PID: 23639 (dockerd)
   CGroup: /system.slice/docker.service
           ├─23639 /usr/bin/dockerd -H fd://
           └─23646 docker-containerd --config /var/run/docker/containerd/containerd.

Jul 15 16:25:16 ip-172-31-22-237 dockerd[23639]: time="2018-07-15T16:25:16.219474061
Jul 15 16:25:16 ip-172-31-22-237 dockerd[23639]: time="2018-07-15T16:25:16.219652506
Jul 15 16:25:16 ip-172-31-22-237 dockerd[23639]: time="2018-07-15T16:25:16.220568680
Jul 15 16:25:16 ip-172-31-22-237 dockerd[23639]: time="2018-07-15T16:25:16.372514585
Jul 15 16:25:16 ip-172-31-22-237 dockerd[23639]: time="2018-07-15T16:25:16.417334495
Jul 15 16:25:16 ip-172-31-22-237 dockerd[23639]: time="2018-07-15T16:25:16.428031717
Jul 15 16:25:16 ip-172-31-22-237 dockerd[23639]: time="2018-07-15T16:25:16.428391717
Jul 15 16:25:16 ip-172-31-22-237 systemd[1]: Started Docker Application Container En
Jul 15 16:25:16 ip-172-31-22-237 dockerd[23639]: time="2018-07-15T16:25:16.451483377
Jul 15 16:38:22 ip-172-31-22-237 systemd[1]: Started Docker Application Container En
lines 1-19/19 (END)
Press CTRL+C to exit the view.
Running Docker Apps
After all the tedious stuff, let us run our Hello World App. Type sudo docker run hello-world. Docker will look for the image locally and after failure load it from Docker Hub, a place that we will often use to get Apps and store our very own. So please feel free to create your own account there. The container image gets pulled and a new container is born. You probably just read this due to the response of the hello-world container. Cheers, you have almost earned your DevOp certificate!
The Docker Hub has a bunch of fantastic R-related images like those made by the rocker peeps Dirk Eddelbuettel and Carl Boettiger. Find out more about rocker on their github page from r-base over shiny to full RStudio images.
RStudio
You know what? Let’s actually install RStudio right now! We will have to install r-base first by typing docker run --rm -ti rocker/r-base. It’ll send us right into the well-known console. You could start right here doing your jobs but I prefer RStudio to console jobs. Just type in docker run -d -p 8787:8787 rocker/tidyverse:3.4.3, this will not only create a container with RStudio but will also already have the r-base and tidyverse installed. As a plus we installed a fixed R snapshot of the available libraries using the tag 3.4.3.
Let’s visit our RStudio, as we all know, it’s just a website. In my case the link is https://18.185.136.0:8787/ replace the IP with yours.
No connection possible? Right! We need to head back to the EC2 dashboard in AWS. The port is not unlocked yet. Click on the attached security group of the instance and click Edit in the bottom window. Add a new inbound rule for Custom TCP connections for the port 8787 and add RStudio as description so we later have no confusion. One more try to connect to our RStudio?
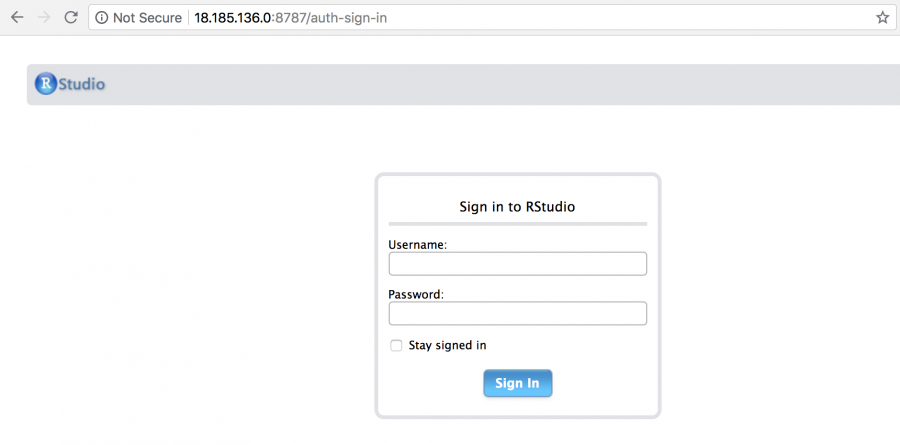
The credentials are rstudio:rstudio by default. You probably want to change those. So let’s quickly kill our container by using docker kill 2295dbfde097 (replace with your docker id, if you don’t remember the id: docker container ls).
For a safer environment we should use docker run -d -p 8787:8787 -e USER=<username> -e PASSWORD=<password> rocker/tidyverse:3.4.3. Pick something secure. Congrats, you can do your work from anywhere now, even on the train from your grandmas phone. To setup RStudio even further, go to the rocker-wiki.
That’s it for today. Next up: How to Automate Data Collection using Open Source Tools
.

A Data Science consultant working at Sopra Steria. He occasionally blogs about data and related topics here and is the host of the Dortmund Data Science Meetup.
Leave a Reply